
Dealing with a chimney leak or planning a roof replacement in Northeast Ohio? You’re probably wondering what exactly goes around a chimney to keep water from seeping into your home. Chimneys create one of the most vulnerable spots on any roof because they’re large penetrations that interrupt the natural water flow.
The materials placed around a chimney to prevent leaks are chimney flashing (step flashing, counter flashing, apron flashing, and back pan flashing) and a roof cricket for chimneys over 30 inches wide. These metal components work together with sealants and underlayment to create a watertight barrier where your chimney meets the roof.
Quick Fact: Building codes require roof crickets on any chimney wider than 30 inches to prevent water pooling and ice buildup behind the structure.
At Peak and Valley Roofing, we’ve seen countless chimney leaks throughout Rocky River, Cleveland, and Northeast Ohio over the years, and almost all stem from improper or failing flashing systems. Understanding what protects your chimney helps you spot problems early and ensures proper installation during roof work.
Types of flashing that protect your chimney
Chimney flashing isn’t just one piece of metal. It’s actually a layered system of different components, each designed to handle water flow at specific areas around your chimney.
Step flashing runs along both sides of your chimney in individual L-shaped pieces. Each piece gets woven between shingle courses, creating a stepped pattern that channels water down and away from the chimney walls. The horizontal leg sits under each shingle while the vertical leg extends up against the chimney side.
Counter flashing covers the vertical legs of step flashing and gets embedded directly into brick mortar joints or attached to siding chimneys. This creates a two-part system where the roof can move independently from the chimney without breaking the water seal. Counter flashing must extend at least 4 inches down over step flashing and be cut at least 1 inch into mortar joints.
Apron flashing protects the front (downslope) side of your chimney where water hits first. This large piece extends under the shingles above and over the shingles below, turning up at least 4 inches against the chimney face to direct water away from the base.
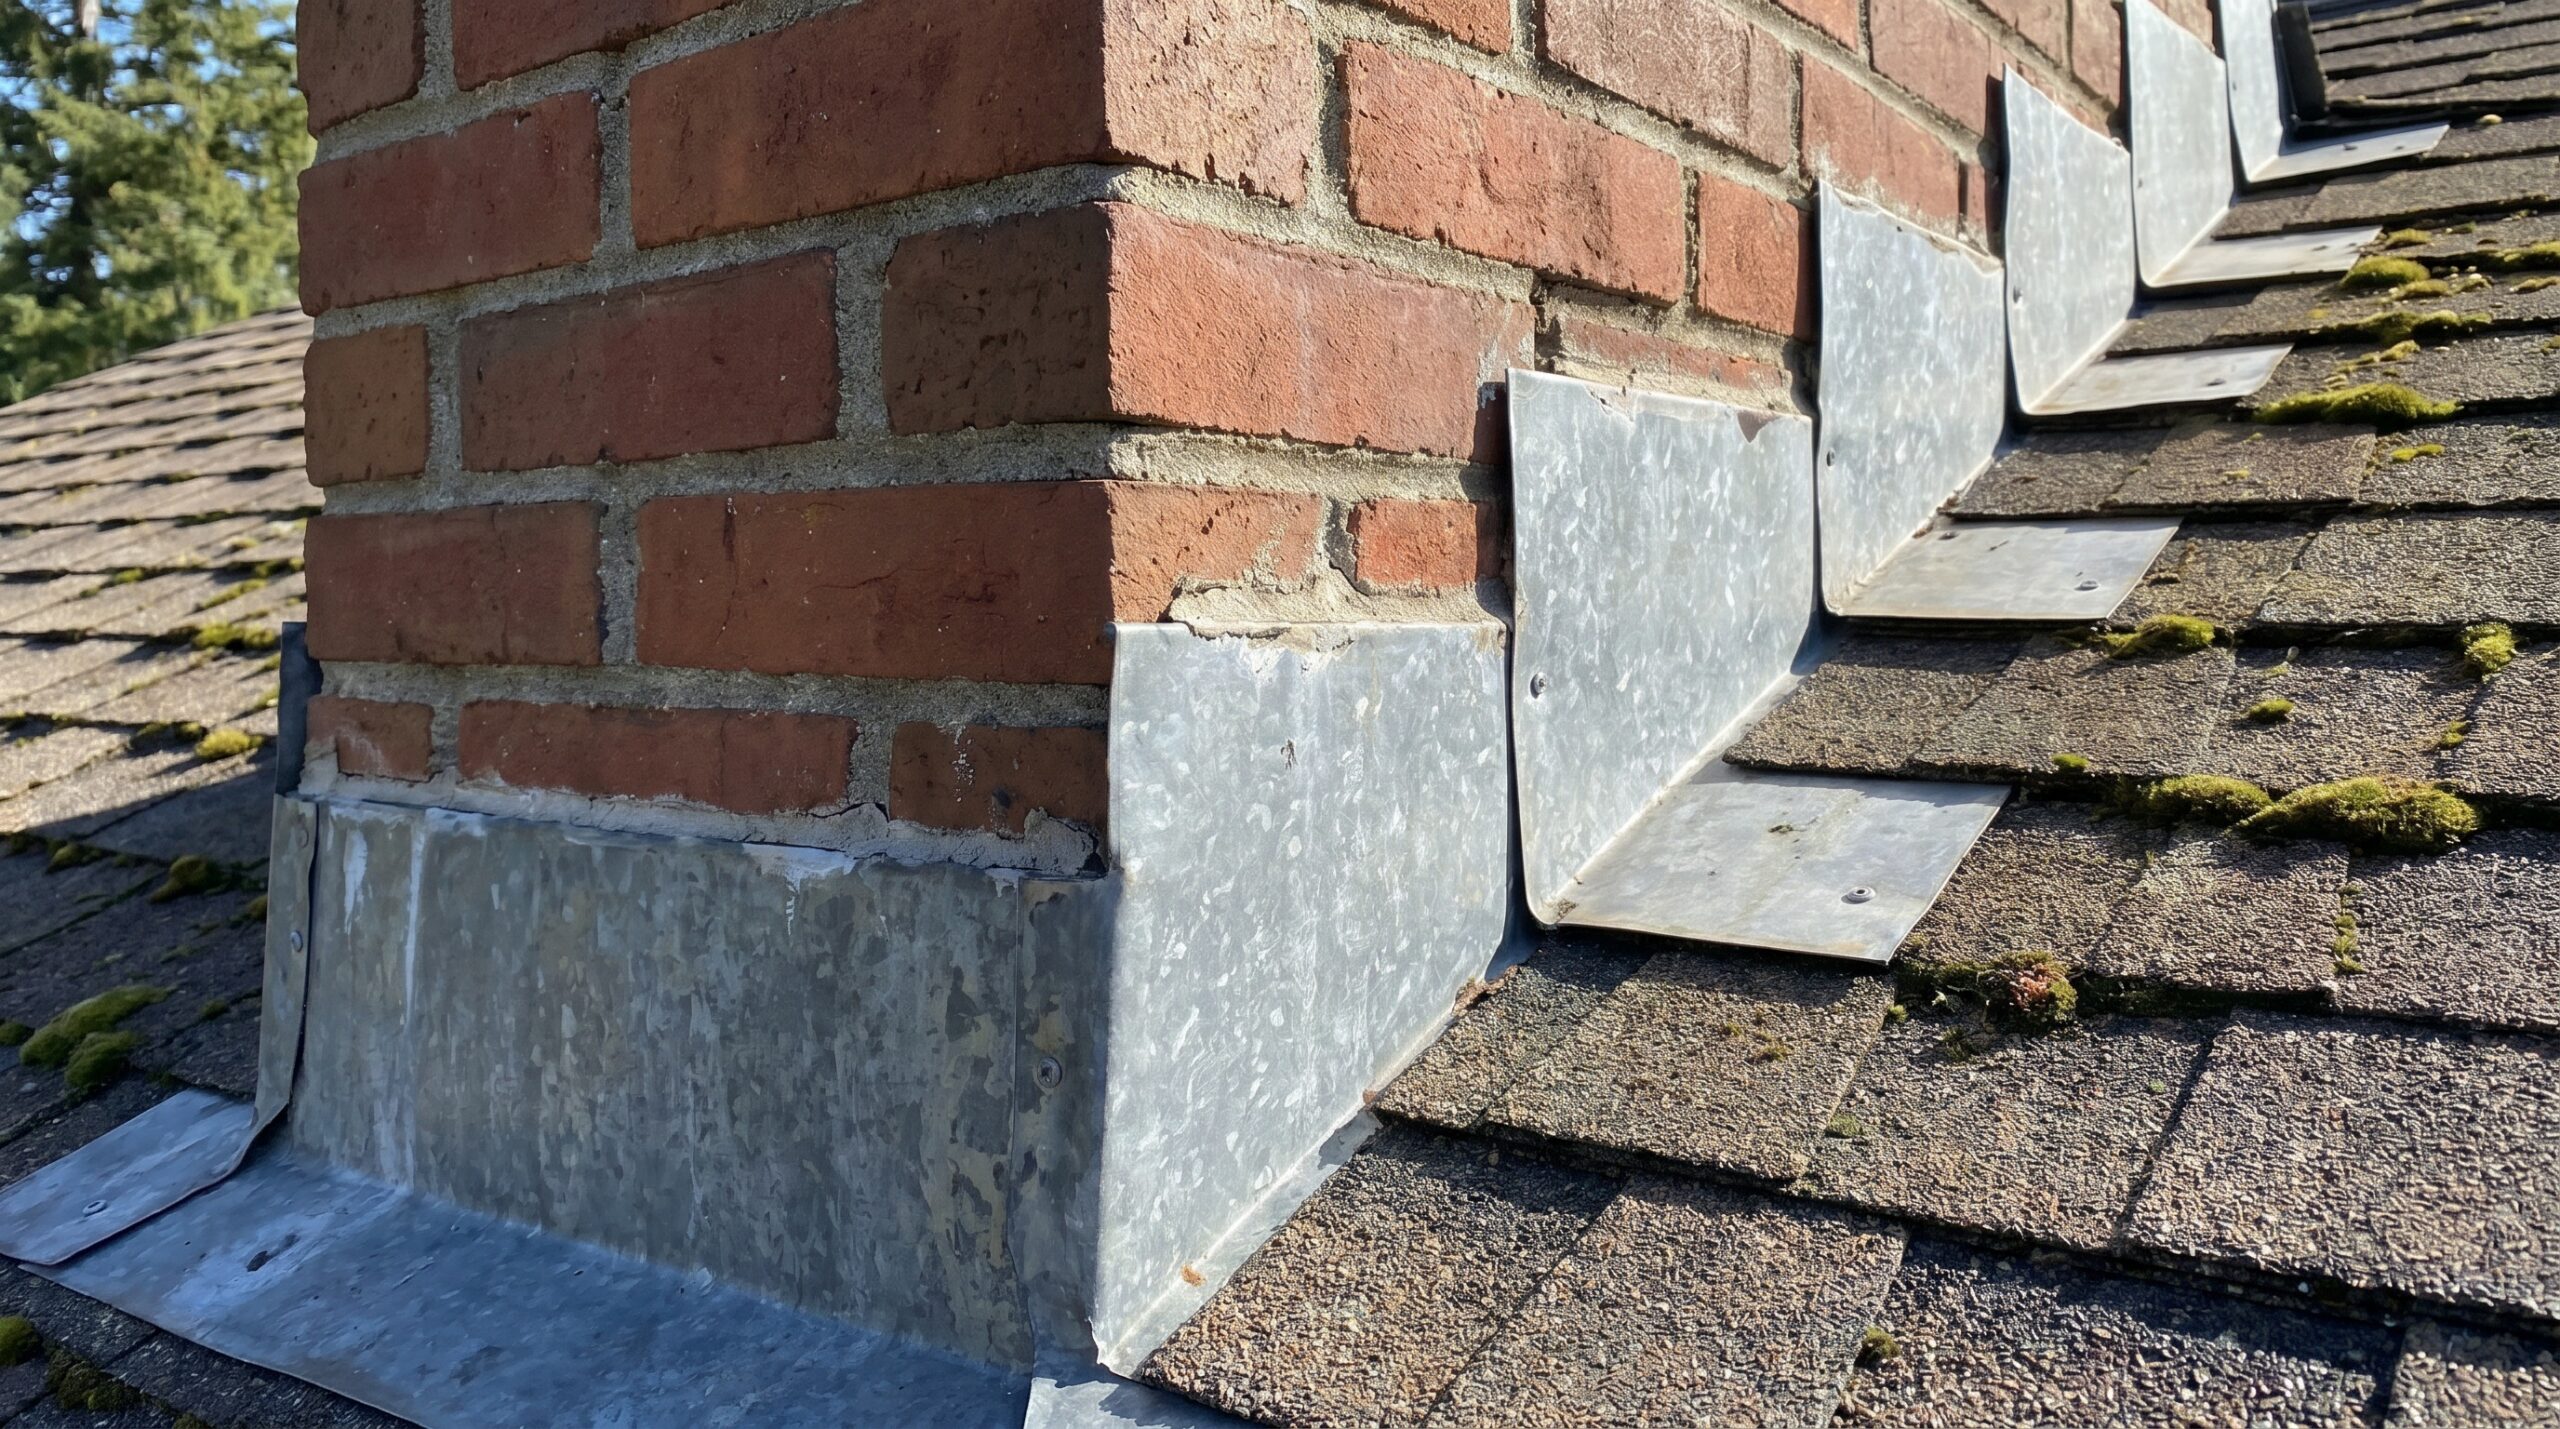
Back pan flashing handles the most challenging area behind your chimney where water naturally wants to collect. This flashing works with a roof cricket to split water flow and send it around both sides of the chimney rather than letting it pool.
Why roof crickets are essential for larger chimneys
A roof cricket looks like a small peaked roof built right behind your chimney. This triangular structure serves a critical purpose that regular flashing alone cannot handle.
Without a cricket, water flowing down your roof hits the flat back wall of your chimney and has nowhere to go. It pools, backs up, and eventually finds its way through even the best flashing system. Ice makes this problem worse in Northeast Ohio’s cold winters, creating massive buildup that can damage both your roof and chimney.
Code Requirement: The International Residential Code mandates crickets on any chimney measuring 30 inches or wider perpendicular to the roof slope, and the cricket must be covered with sheet metal or matching roofing material.
The cricket’s peaked design splits water flow before it reaches your chimney, sending it down both sides where step flashing can handle it properly. This dramatically reduces the water load on your flashing system and prevents the pooling that causes most chimney leaks.
Common causes of chimney leaks you should know
Understanding why chimneys leak helps you spot problems before they cause serious damage to your home’s interior. In Cleveland’s climate, with our heavy spring rains and winter freeze-thaw cycles, proper flashing is especially critical.
Flashing problems cause the majority of chimney leaks from a roofing perspective. This includes improperly installed flashing with inadequate overlap, missing pieces, or metal that’s reached the end of its lifespan. When flashing fails, water has a direct path into your home with nothing to stop it.
Missing roof crickets on chimneys over 30 inches wide create water pooling that overwhelms even good flashing. Many older homes in Rocky River and Cleveland have large chimneys that were built before current code requirements, leaving them vulnerable to leaks during heavy rain or snow melt.
Failed sealants and caulking around flashing joints and fastener holes let water seep through small gaps. While sealants shouldn’t be the primary waterproofing method, they’re essential for sealing the final details that keep your flashing system watertight.

Chimney structure issues can also cause leaks that appear to come from the roof. Cracked mortar joints, damaged chimney crowns, or porous masonry that absorbs water during long rain periods can all drip water inside your home.
How professional flashing installation works
Proper chimney flashing installation follows a specific sequence that ensures each component overlaps correctly to shed water away from your home. As a family-owned roofing company serving Northeast Ohio, we’ve refined our installation process to handle the unique challenges of our local climate.
The process starts with inspection and preparation of both the chimney and surrounding roof area. Old flashing gets removed, surfaces are cleaned, and any damage to shingles or masonry gets addressed before new materials go on. Our team also checks for storm damage that might not be immediately visible, especially important given Ohio’s severe weather patterns.
Underlayment and ice barrier installation comes next, with special attention to the chimney area. Many roofers install ice and water shield around the entire chimney base to provide an extra layer of protection beneath the flashing system – particularly important in Northeast Ohio where ice dams are common.
Base flashing installation begins at the front of the chimney, extending the proper distance up the chimney wall and out onto the roof deck. This piece must integrate properly with the shingles above and below it.
Step flashing goes in piece by piece as each shingle course gets installed along the chimney sides. Each L-shaped piece overlaps the one below by at least 2 inches, and the shingles lap over the horizontal legs while leaving the vertical legs exposed for counter flashing.
Cricket construction and back pan installation happen together for chimneys that need them. The cricket gets framed, sheathed, and covered with the same roofing material as your main roof, then flashed where it meets the chimney.
Counter flashing installation completes the system by covering all the vertical flashing legs. On brick chimneys, this means cutting reglets (grooves) into mortar joints and sealing the flashing edges with high-quality sealant.
The entire system gets a final inspection and water test when possible to ensure everything works together properly. Quality installation means your chimney flashing should last 20-30 years with minimal maintenance.
Understanding what goes around your chimney to prevent leaks helps you make informed decisions about roof work and spot potential problems early. Both flashing and crickets are essential components that work together to keep water flowing properly around one of your roof’s most challenging areas. When installed correctly by experienced professionals, these systems provide decades of reliable protection for your home.