
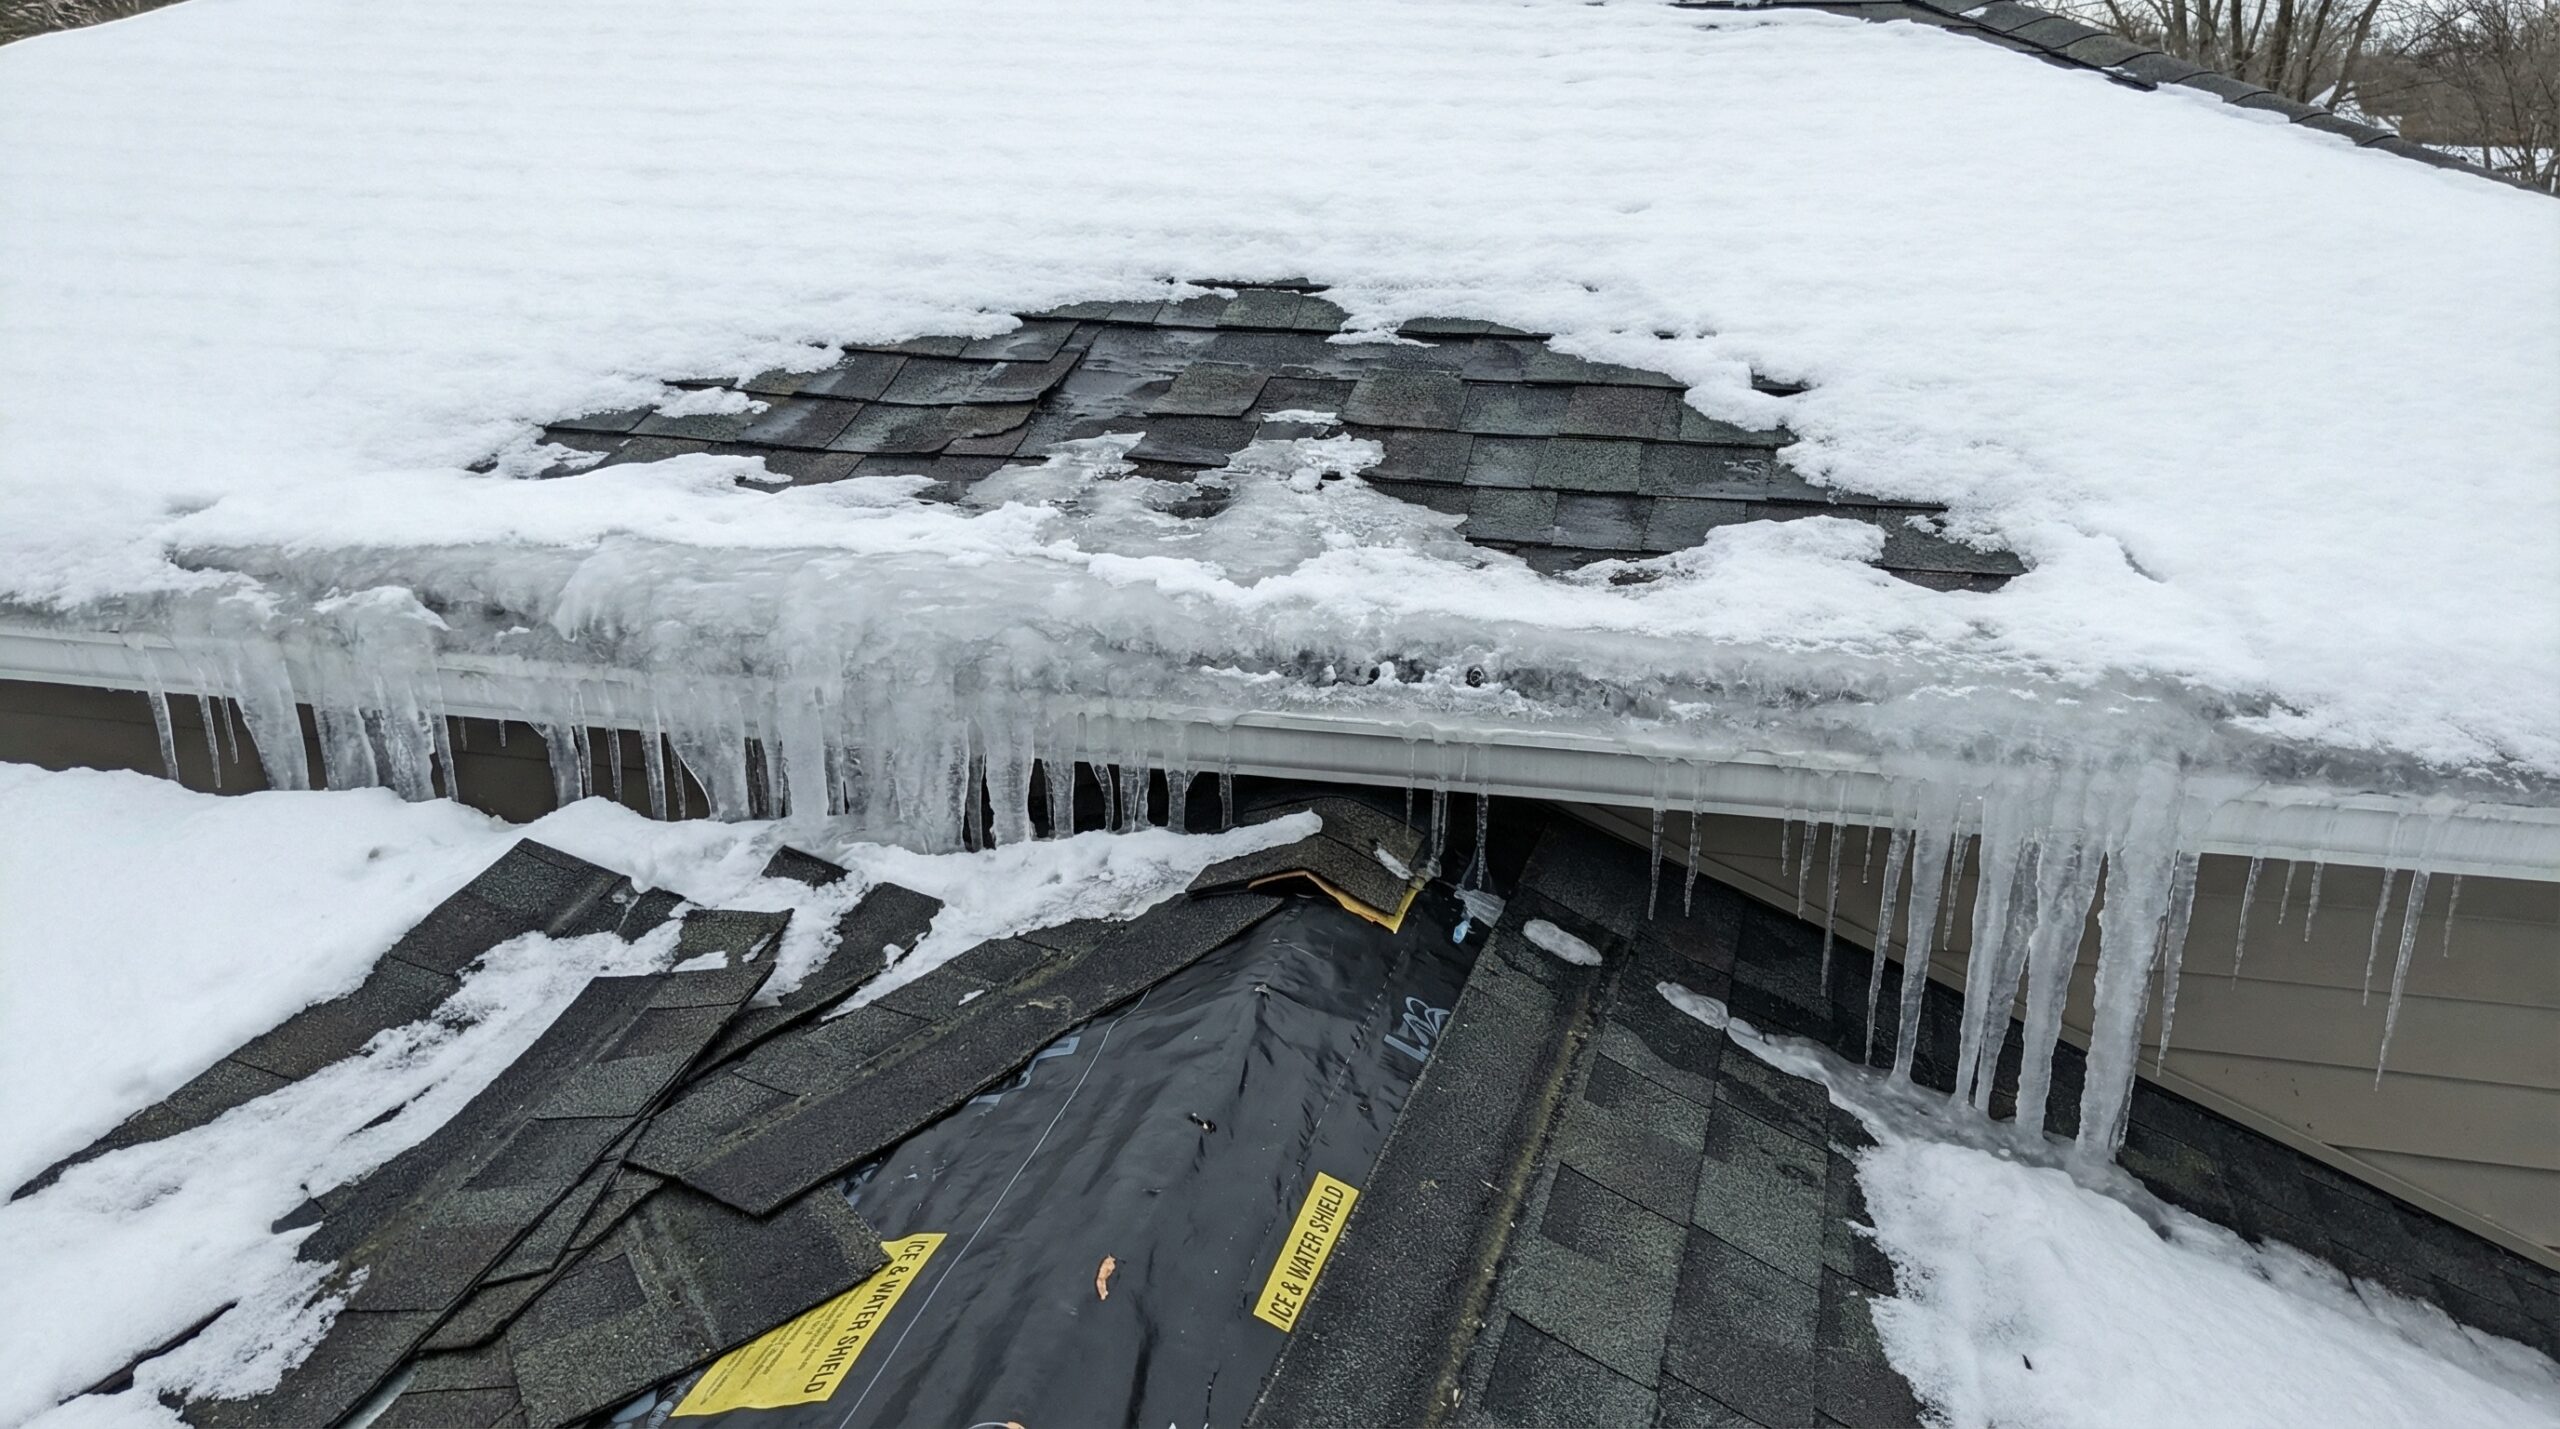
Ice dams cause thousands of dollars in water damage to unprotected roofs every winter. Without proper protection, melted snow becomes trapped, forcing water under your shingles and into your home. An ice and water shield acts as a waterproof barrier that prevents this costly damage by creating a watertight seal between your roof deck and shingles.
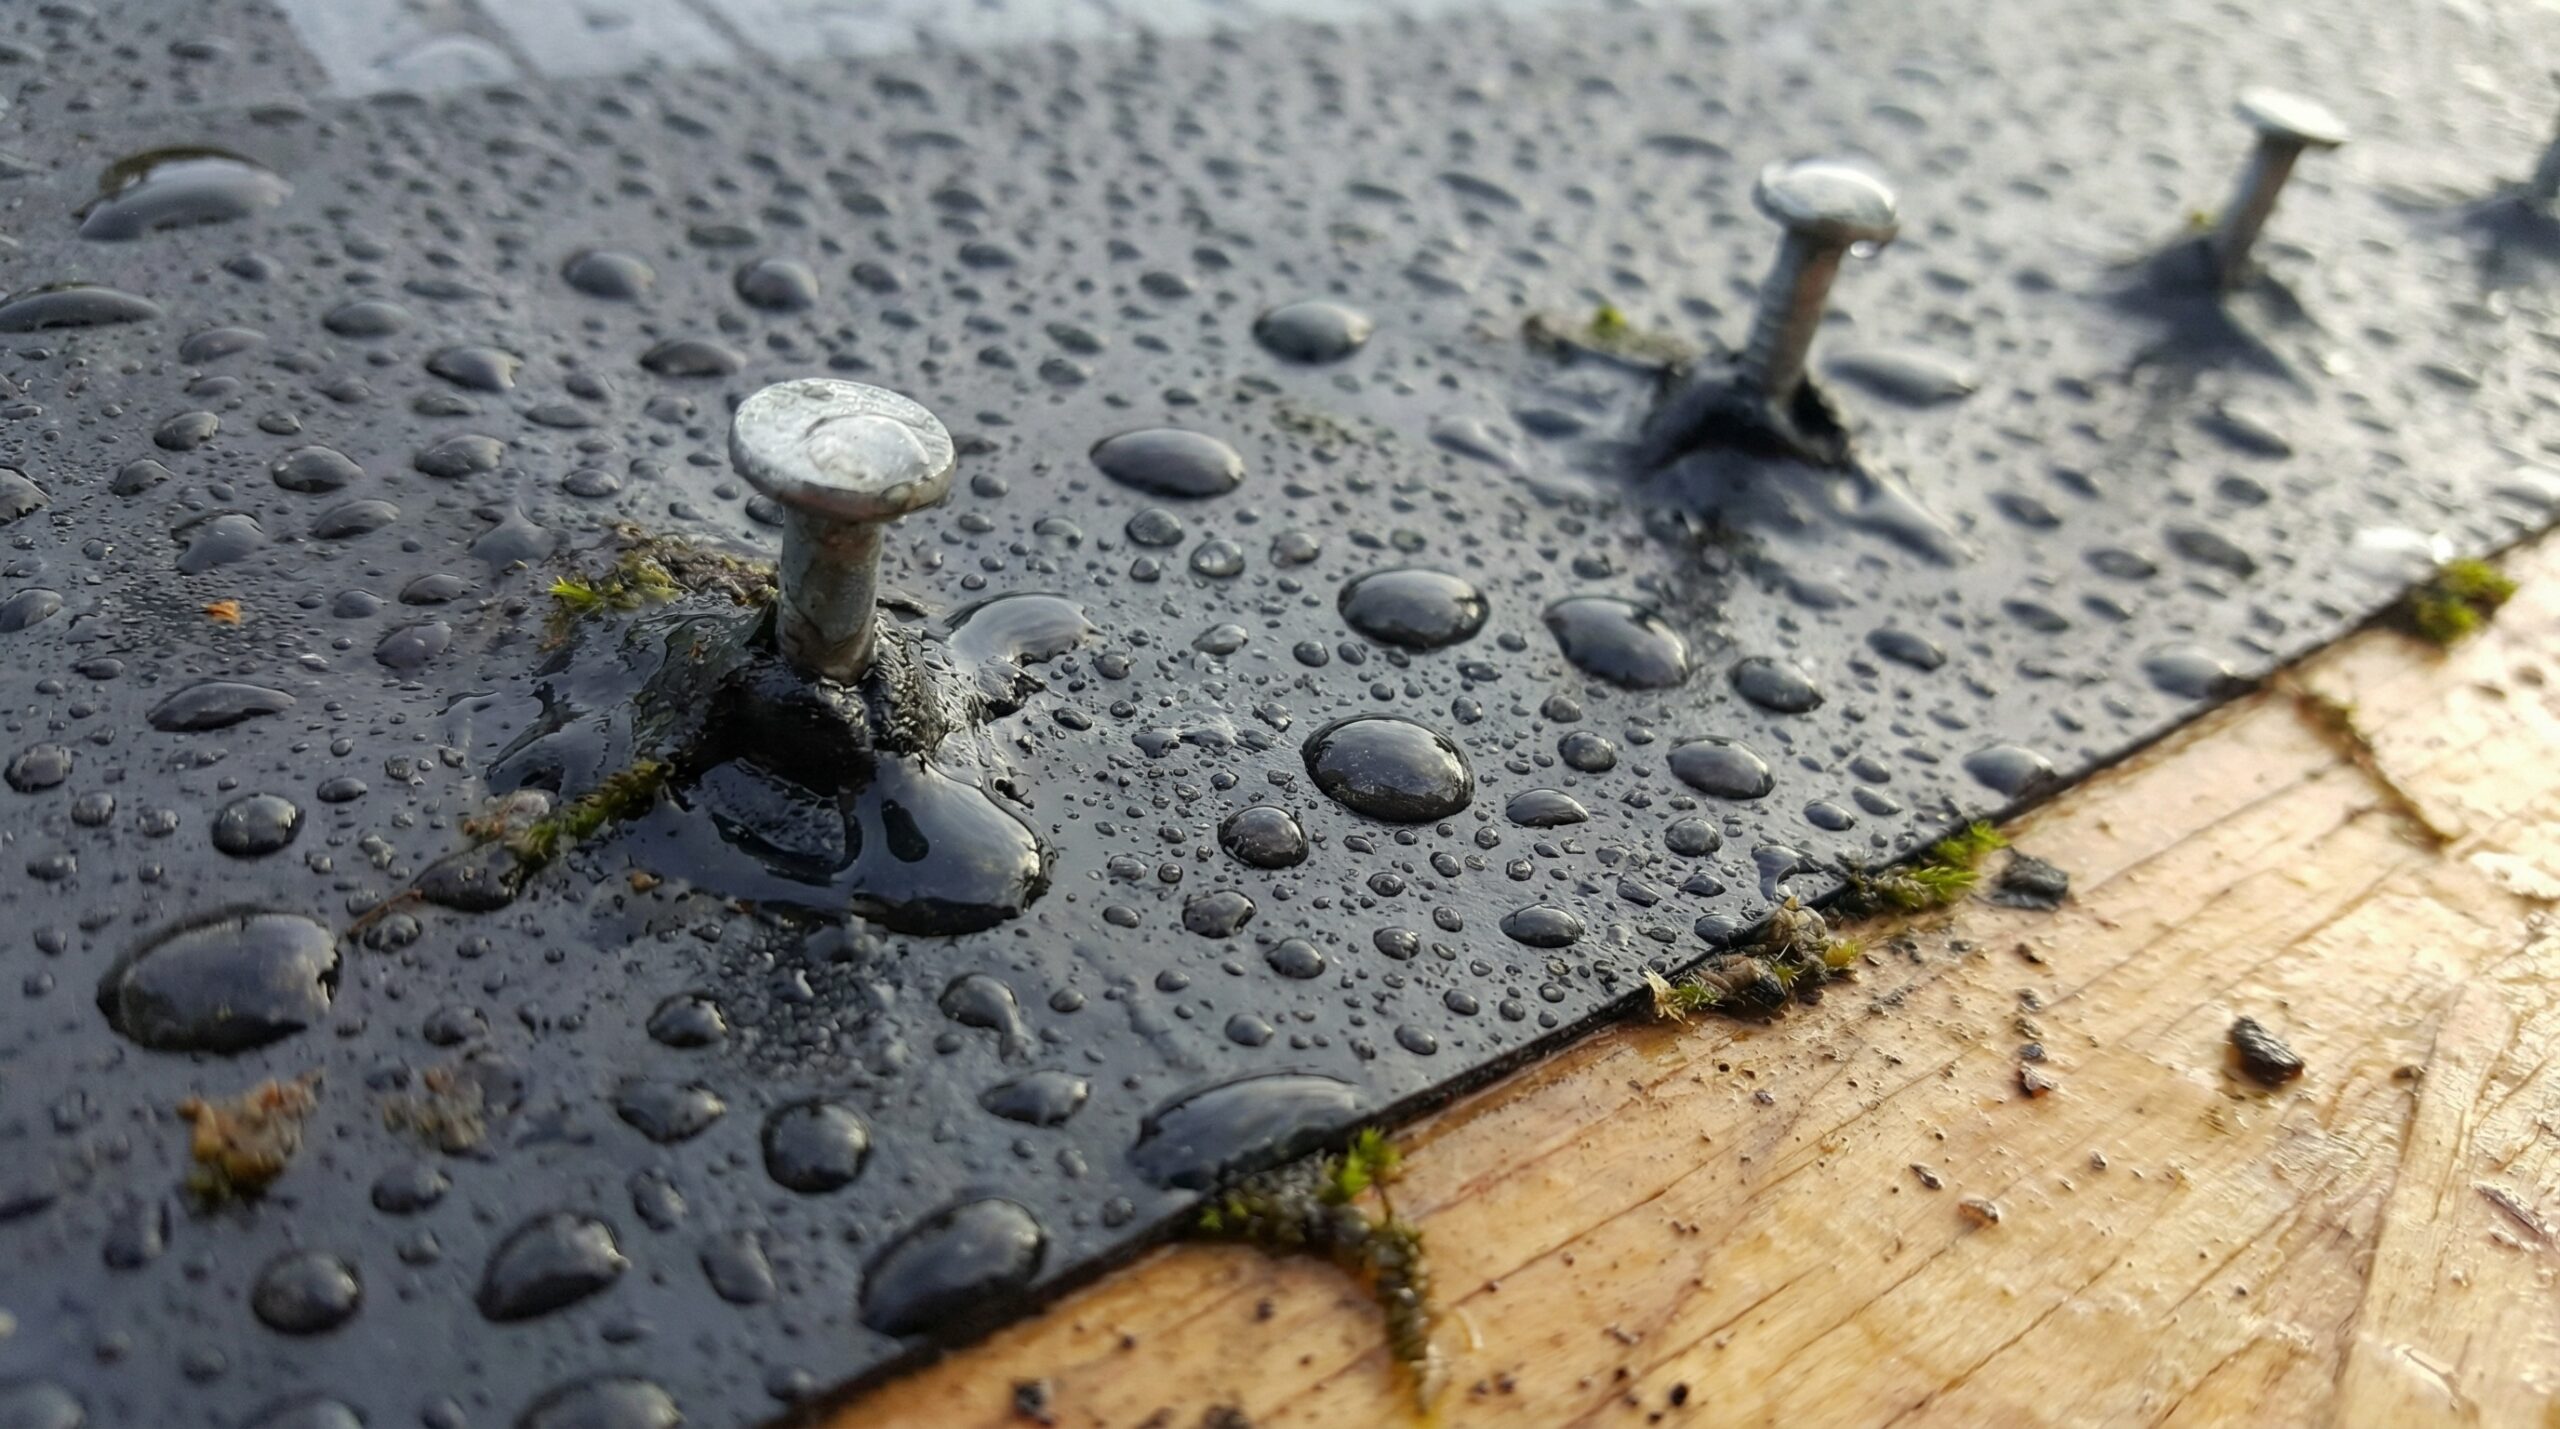
This protective membrane, made from rubberized asphalt and polymer materials, adheres directly to your roof surface and self-seals around nail penetrations. When properly installed, it stops water infiltration even when ice dams form or wind-driven rain pushes moisture under your roofing materials.
Quick fact: Ice and water shields can prevent up to 95% of water damage caused by ice dams and severe weather conditions, making them one of the most cost-effective roof protection investments you can make.
Understanding how this protection works and when you need it can save you from expensive repairs and give you peace of mind during harsh weather seasons.
Understanding ice and water shield technology
An ice and water shield is a self-adhering waterproof membrane that creates an impenetrable barrier against moisture infiltration. Unlike traditional roofing underlayment that relies on mechanical fasteners, this advanced protection uses a sticky bitumen backing that bonds permanently to your roof deck.
The shield consists of two main components working together. The bottom layer contains rubberized asphalt that provides the adhesive properties and waterproofing capabilities. The top surface features a smooth polymer film that allows shingles to lay flat while maintaining flexibility in temperature extremes.
What makes this technology particularly effective is its self-sealing properties. When roofing nails penetrate the membrane during shingle installation, the rubberized material automatically flows around the nail shaft, creating a watertight seal. This prevents the nail holes from becoming entry points for water infiltration.
The membrane remains flexible even in freezing temperatures, preventing cracking or splitting that could compromise its protective barrier. This flexibility also allows it to expand and contract with your roof’s natural movement without losing adhesion or developing gaps.
Types of ice and water shield for different applications
Choosing the right type of ice and water shield depends on your roof design, climate conditions, and specific application needs. Three main varieties offer different advantages for various roofing situations.
High-heat ice and water shields work best for metal roofing applications and areas with extreme temperature fluctuations. These shields contain special additives that prevent them from becoming too sticky in high temperatures, which could damage the membrane when metal roofing expands and contracts. They also provide excellent UV resistance for exposed applications.
Smooth surface shields offer the most versatile option for standard residential applications. Their uniform texture works well with asphalt shingles, wood shakes, and slate roofing materials. These shields provide reliable protection at a moderate cost point, making them popular for whole-roof coverage.
Granular or sand-surface shields represent the thinnest option, specifically designed for roof valleys and areas where space constraints matter. The granulated surface provides better grip for workers during installation and helps prevent slipping on steep roof sections.
| Shield Type | Best Application | Temperature Range | Thickness | Durability |
|---|---|---|---|---|
| High-Heat | Metal roofs, extreme climates | -40°F to 180°F | 40-60 mil | 25+ years |
| Smooth Surface | Standard residential | -20°F to 140°F | 36-40 mil | 20-25 years |
| Granular/Sand | Valleys, tight spaces | -20°F to 120°F | 28-36 mil | 15-20 years |
Installation process and critical placement areas
Proper installation determines whether your ice and water shield provides reliable protection or becomes a costly failure. The process requires careful attention to surface preparation, placement, and sealing techniques that ensure long-term performance.
Surface preparation begins with cleaning the roof deck of all debris, dust, and moisture. The deck must be completely dry before installation, as trapped moisture can prevent proper adhesion and lead to membrane failure. Any protruding nails should be driven flush, and gaps between deck boards should not exceed standard spacing requirements.
Installation starts at the roof’s lowest point and works upward, ensuring proper water flow direction. Each row must overlap the previous one by at least six inches, with end joints staggered to prevent water infiltration paths. The membrane should extend beyond the exterior wall line to protect the roof edge with proper drip edge installation from ice dam backup.
Critical placement areas require special attention during installation. Valleys need full coverage extending at least 18 inches up each roof slope to handle concentrated water flow. Around roof penetrations like vents and chimneys, the shield should extend at least six inches in all directions, with proper flashing techniques around the penetration itself.
Installation tip: Apply firm pressure with a hand roller or similar tool to ensure complete adhesion, especially at overlaps and edges where lifting could compromise the waterproof seal.
The self-sealing properties activate when starter shingles and roofing materials are installed over the membrane. Each nail penetration automatically seals itself, but proper nail placement remains important to avoid unnecessary punctures in critical areas.
Benefits and long-term value for homeowners
Installing ice and water shield provides multiple layers of protection that extend far beyond basic water resistance. The investment pays dividends through prevented damage, extended roof life, and improved home value over time.
Water damage prevention represents the most immediate benefit, potentially saving thousands in repair costs. When ice dams form, unprotected roofs can suffer damage to ceilings, walls, insulation, and flooring as water backs up under shingles. The shield creates an impenetrable barrier that stops this water infiltration regardless of how ice dams develop.
Structural protection extends your roof’s lifespan by preventing moisture-related deterioration. Wood rot, mold growth, and insulation damage all result from water infiltration that ice and water shield prevents. By maintaining dry conditions in your roof assembly, the shield helps preserve the structural integrity of your entire roofing system.
Building code compliance becomes increasingly important as many regions now require ice and water shield installation in vulnerable areas. Meeting these requirements ensures your roof passes inspections and maintains your home’s insurability. Some insurance companies even offer discounts for homes with comprehensive ice and water protection.
The shield’s durability means this protection continues working for decades with minimal maintenance. Quality installations typically last 20 to 25 years, often matching or exceeding the lifespan of the roofing materials they protect.
Cost consideration: While ice and water shield adds to initial roofing costs, it typically prevents damage worth 10 to 20 times the installation investment over its lifetime.
Peak and Valley Roofing recommends ice and water shield installation for all homes in climates prone to ice formation or severe weather. Our experienced team ensures proper installation techniques that maximize protection and longevity, giving you confidence that your roof can withstand whatever weather conditions develop.
Understanding ice and water shield technology helps you make informed decisions about protecting your most valuable investment. Whether you’re installing a new roof or upgrading existing protection, this waterproof barrier provides essential defense against nature’s most challenging conditions while delivering long-term value for your home.