
Water stains on your ceiling after Cleveland’s winter storms or ice dams backing up under your shingles can signal missing or improperly placed ice and water shield. This self-adhering waterproof membrane protects the most vulnerable areas of your roof from leaks caused by ice dams and wind-driven rain that are all too common in Northeast Ohio.
Ice and water shield goes primarily along roof eaves (extending 24-36 inches from the edge), in all valleys, around penetrations like chimneys and vents, and against walls where step flashing is used. The exact placement depends on your climate, roof slope, and local building codes—and in Northeast Ohio’s harsh winter conditions, proper placement is absolutely critical.
Key Fact: Ice and water shield is required by building codes in most northern states along eaves and valleys, with minimum coverage of 24 inches past the interior wall line.
In this guide, you’ll discover exactly where ice and water shield should go on your roof, how much coverage you need, proper sequencing with drip edge, and when full-roof coverage makes sense for Northeast Ohio homes.
What is ice and water shield and why placement matters
Ice and water shield is a rubberized asphalt membrane with an adhesive backing that bonds directly to your roof deck. Unlike standard underlayment that only resists water, this material creates a completely waterproof barrier and self-seals around every nail driven through it.
The membrane’s placement is critical because it only protects where it’s installed. Missing coverage at vulnerable spots like eaves or valleys leaves your home exposed to the exact areas where leaks most commonly occur. Poor placement can void warranties, fail building inspections, and lead to costly interior damage from water infiltration.
When ice dams form along Cleveland area roofs during our harsh winters, warm attic air melts snow on the upper roof. That water runs down and refreezes at the colder eaves, creating an ice dam that pushes water back up under shingles. Without proper ice and water shield placement, that backed-up water goes straight into your roof decking and home interior.
Where does ice and water shield go on your roof
The strategic placement of ice and water shield focuses on your roof’s most vulnerable areas where water infiltration is most likely to occur—especially important for Rocky River and Cleveland area homes that face severe winter weather.
Eaves and overhangs
Your roof eaves are the primary location for ice and water shield because they’re where ice dams typically form during Northeast Ohio winters. The membrane should extend from the roof edge up the slope at least 24 inches past the interior wall line of your home. In our cold climate, extending coverage to 36 inches or even 6 feet provides better protection against severe ice dam conditions that are common in the Cleveland area.
This coverage protects the critical area where your heated home meets the cold overhang. When ice dams push water back under shingles—a frequent occurrence during Cleveland’s freeze-thaw cycles—the waterproof membrane prevents that water from reaching your roof decking.
Valleys and water channels
Roof valleys channel large volumes of water and are high-risk areas for leaks, especially during Northeast Ohio’s heavy spring rains and snow melts. Ice and water shield should run the full length of every valley, extending at least 18 inches on each side of the valley centerline. Some manufacturers recommend wider coverage depending on the roof slope and local weather conditions.
Valley installation requires careful attention to overlaps and proper sequencing with other roofing materials to maintain the continuous waterproof barrier.

Around penetrations and roof features
Any feature that penetrates your roof creates a potential leak point that benefits from ice and water shield protection. This includes chimneys, vent pipes, skylights, and dormers. The membrane should extend at least 12 inches around the base of each penetration, working in conjunction with flashing systems.
For skylights and larger penetrations, coverage should extend at least 6 inches beyond the flashing on all sides. The ice and water shield is installed before the flashing to create a continuous waterproof barrier beneath the metal work.
Installation Tip: Ice and water shield goes under step flashing at wall intersections to provide backup protection behind the metal flashing system.
Low-slope areas and special considerations
Roof sections with slopes below 4:12 pitch are more vulnerable to water pooling and wind-driven rain. Many professionals recommend covering these entire low-slope sections with ice and water shield rather than just the standard eave and valley coverage.
In Northeast Ohio, with our severe weather conditions including heavy snow loads and ice storms, some areas may also benefit from ice and water shield along ridges and hips, though this isn’t typically required by building codes.
How much ice and water shield do you need
The amount of ice and water shield depends on your roof size, slope, and climate zone. Most ice and water shield products come in 3-foot-wide rolls, so coverage calculations are based on these standard dimensions.
For a typical Northeast Ohio home, you’ll need at least two rows along eaves due to our severe cold conditions. Each valley requires full-length coverage, and each penetration needs wrapping coverage. A simple calculation for a 30-foot eave length would require 30 linear feet of membrane, plus additional material for overlaps and waste.
| Roof Area | Typical Coverage | Purpose |
|---|---|---|
| Eaves | 24-36 inches up slope | Ice dam protection |
| Valleys | Full length, 18 inches each side | Water channel protection |
| Penetrations | 12+ inches around base | Flashing backup |
| Low-slope areas | Full coverage | Pooling water protection |
Building codes in northern states typically require minimum coverage, but many roofing professionals in the Cleveland area recommend exceeding these minimums for better protection against our harsh winters. The investment in additional coverage often pays for itself by preventing costly leak repairs.
Ice and water shield and drip edge installation sequence
The relationship between ice and water shield and drip edge is crucial for proper water management. At the eaves, drip edge flashing should be installed first, then the ice and water shield is applied over the drip edge and extends up the roof slope.
This sequencing ensures that water running off the membrane flows onto the drip edge rather than behind it. However, some manufacturers recommend specific installation sequences that may vary from this general rule, so always follow the specific product instructions for your materials.
At rake edges (the sloped sides of gabled roofs), the sequence is typically reversed, with ice and water shield installed first, then drip edge over the membrane. This prevents wind-driven rain from getting behind the flashing system.
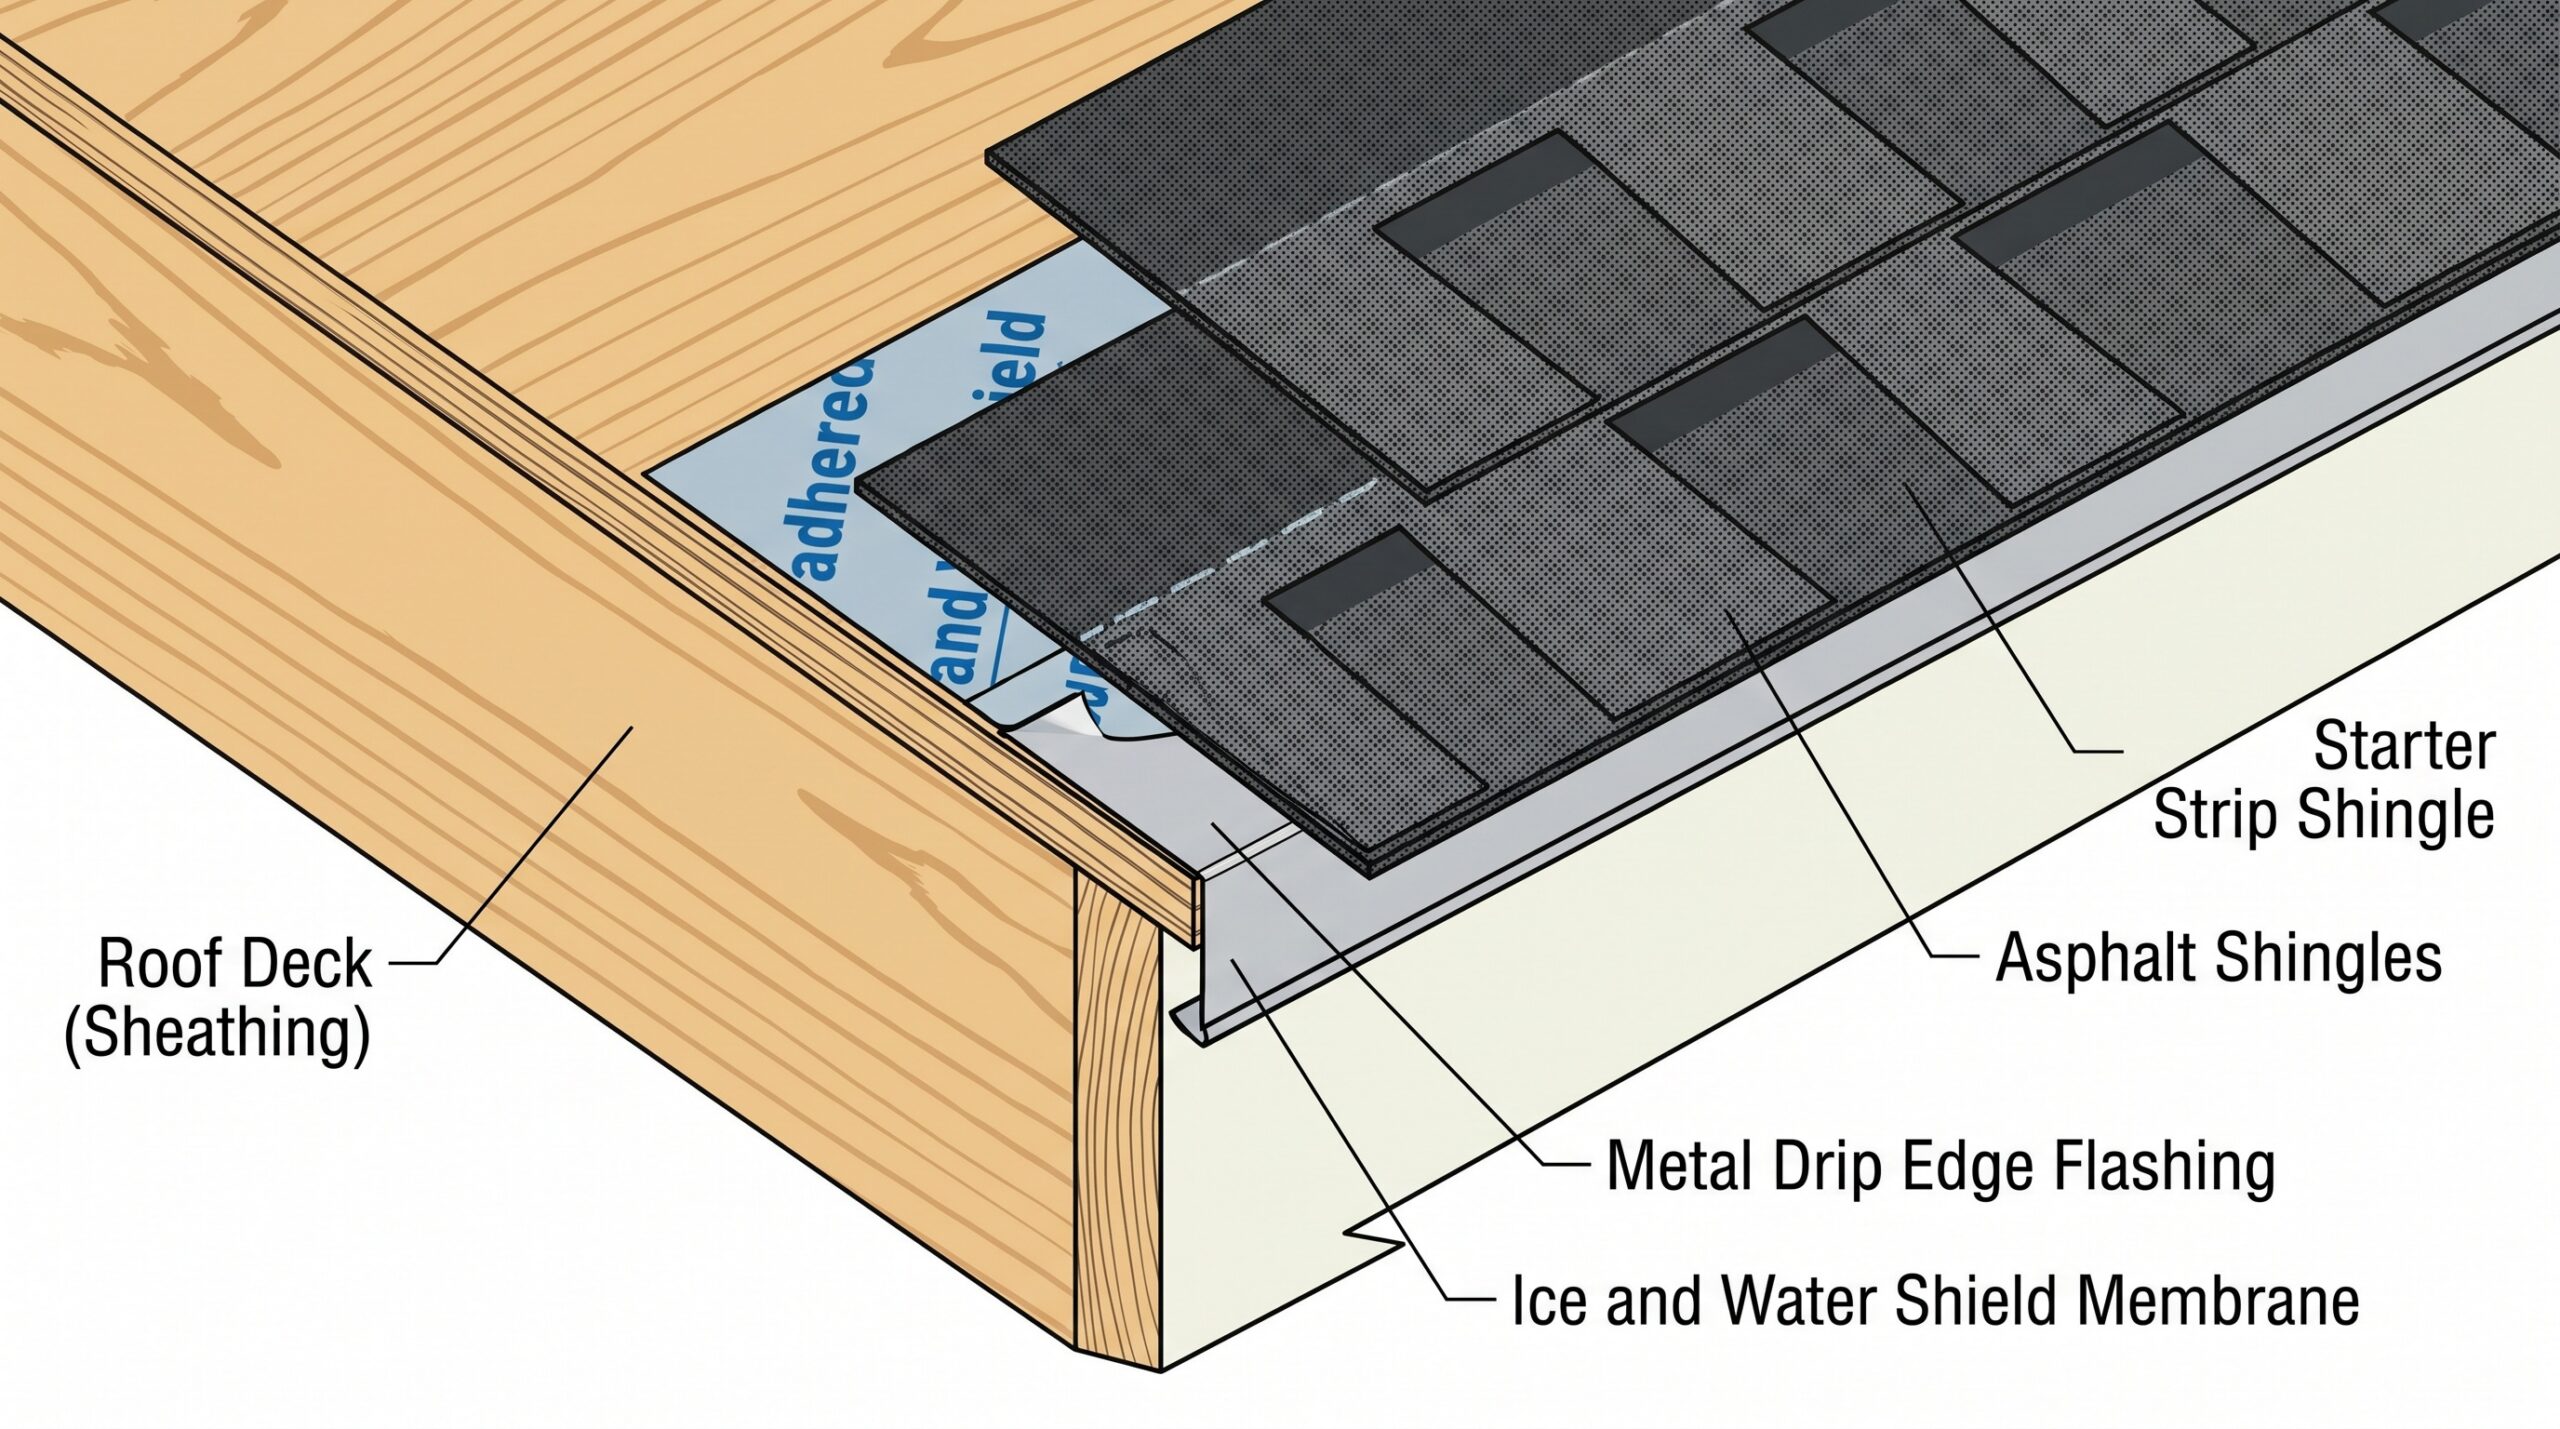
The key is maintaining proper water flow direction so moisture always sheds away from your roof deck and home interior. Incorrect sequencing can create water traps that lead to leaks and rot.
Understanding where ice and water shield goes on your roof helps protect your Northeast Ohio home from costly water damage. The critical areas are eaves, valleys, and penetrations, with coverage extending well beyond the vulnerable zones. Proper installation creates a waterproof barrier that works with your flashing systems to keep water out, even during Cleveland’s severe winter storms and ice dam conditions.
If you live in Rocky River, Cleveland, or anywhere in Northeast Ohio, ensuring your roof includes proper ice and water shield placement is essential given our climate. This investment in the right locations helps avoid expensive repairs and keeps your home dry through our harsh winters and heavy spring rains.